Table of Contents
As a project manager, one of the most important things you can do is to accurately estimate the time it will take to complete tasks. This will help you to set realistic deadlines and avoid scope creep. However, it can be difficult to estimate time accurately, especially for complex projects.
That’s where Harvest and Jira come in. These two tools can help you to track your time and progress, so you can get a better understanding of how long tasks are actually taking. This information can then be used to improve your estimates in the future. In this blog post, we’ll show you how to use the two apps together to create time estimates that are both accurate and efficient.
Jira and Harvest
Jira: Jira is a project management tool that helps teams track issues, manage projects, and automate workflows. It also has a number of features that make it easy to create time estimates, such as the ability to set deadlines and track your progress over time. Harvest: A time tracking and invoicing app that allows you to create invoices, track payments, and manage your finances. It also has a number of features that make it easy to create invoices for tracked time, expenses, or fixed fees.
How to Use Jira and Harvest Together
To use the two apps together, you’ll first need to create an account in both apps. Once you’ve created your accounts, you’ll need to connect the two apps together. Once the two apps are connected, you can start tracking your time in Jira.
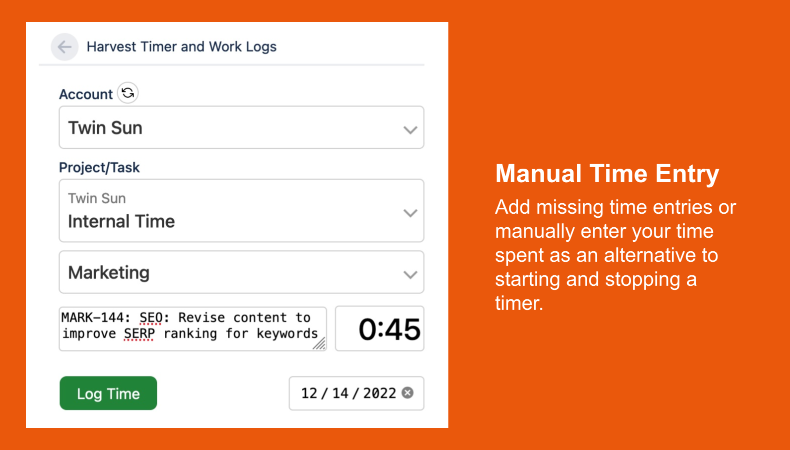
When you start working on a task, simply start a timer in Jira. With our Harvest Timer and Work Logs for Jira app, the time tracked here will be reflected in Harvest as well as Jira. When you’re finished with the task, stop the timer. You also have the ability to manually log time with the app as an alternative to starting or stopping a timer.

Jira will keep track of all of the time you spend on each task. This data is then recorded in Harvest with a tag related to the associated task.
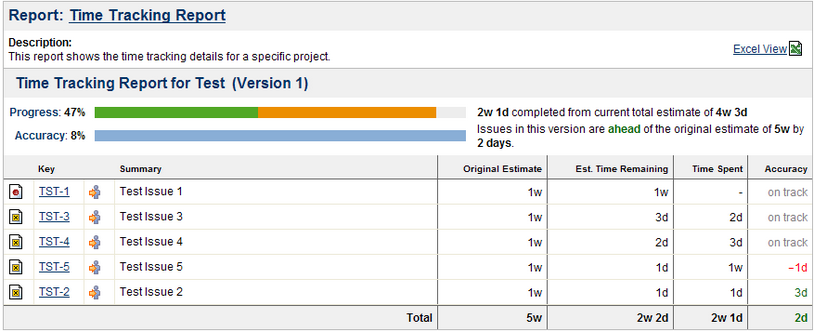
To create a time estimate report in Jira, go to Reports, then Time Tracking Report. Here, you can set your criteria for the report. What you will get is a detailed report for the time estimate for the overall project as well as each of its related tasks. You will also be able to see if you are ahead or behind schedule for anything related to the project.
Here is an example of what a report might look like:

The table has four fields: original estimate, estimated time remaining, time spent, and accuracy. The data from each of these fields is totalled at the bottom and used to create the two bar graphs above. These bar graphs allow you to see whether you are ahead or behind schedule on the project at a glance.
Here’s a closer look:

For this project, the Progress bar indicates that 47% of the overall project time estimate has been spent. The Accuracy bar is also longer than the Progress bar meaning that issues in the project are ahead of the original time estimate. The gray region in the Progress bar shows the amount of time they are ahead of the estimate.
If issues were behind the original estimate, this is what the bar graphs would look like:

In this instance, the Accuracy bar is shorter than the Progress bar. This means that issues in the project are behind the original estimate. The gray region in the Accuracy bar shows the amount of time they are behind the estimate.
Conclusion
With the information available from the Time Tracking Report, you can create detailed invoices in Harvest while working solely in Jira.
By using Harvest and Jira together, you can easily create accurate time estimates and invoices. This will help you to keep your projects on track and avoid missed deadlines. Try Harvest Timer and Work Logs for Jira to see how it can help you to improve your estimate accuracy.
