
Table of Contents
A long-term client of ours had managed their web applications in a colocation data center for several years. Their apps ran on snowflake servers: unique, manually configured servers that could not be easily replaced. Snowflake servers pose a disaster recovery risk, but that concern was secondary to the amount of time the IT department was spending troubleshooting problems on their physical servers.
Diagnosing problems with each application was troublesome: IT administrators were (understandably) unfamiliar with the ins and outs of every web app. Some of their infrastructure was inherited from a previous team, who left little documentation behind. Keeping the lights on was becoming a larger and larger burden. Downtime and degraded performance issues began increasing in frequency and severity.
As their web applications gained popularity, the existing infrastructure failed to keep up. Response times increased drastically during high-traffic times, with servers sometimes becoming entirely unresponsive. This led to a frustrating user experience for the majority of users, including internal stakeholders who depended on some of these web apps for their daily work.
Analyzing their infrastructure
The client’s IT manager reached out to us to see if we could help migrate 16 of their sites to a cloud hosting provider and improve infrastructure reliability. We already maintained a few of their web applications, so they knew we would be familiar with what was needed to support a migration. We also have plenty of experience managing complex services and web apps hosted on Amazon Web Services (AWS).
The IT team’s goals for the new cloud-based infrastructure were (1) to reduce the time investment required to maintain their infrastructure, and (2) to minimize downtime. We began reviewing their existing setup with these goals in mind. As we dug in deeper, we realized that there were a few issues with the existing setup that needed to be addressed as part of the migration.
First, many of the web applications were making hundreds of database calls for each request. These apps ran well enough most of the time, but database connections quickly became the constraint during high-traffic times. This performance bottleneck was exacerbated by the fact that several web apps were hosted on each server: a surge in traffic to one of the sites would bring down several of them.
Second, some of the applications were as unique as the servers they were hosted on. The sites used a mix of older web development frameworks. This meant we’d need to review each application to uncover any dependencies or constraints that might need to be accounted for in a server migration. We’d have to take a slightly different approach to configuring and migrating each application.
Third, several of the apps had databases that were in unexpected or corrupted states. Some databases lacked foreign key integrity checks, and some tables had become corrupt due to the server running out of disk space from time to time. We’d definitely need to fix the corrupted tables, and decided we’d turn on foreign key integrity checks to hopefully avoid any future data integrity problems.
Preparing a migration plan
We identified steps we needed to take to address these issues and ensure the migrations would be a success.
- Map the existing architecture to discover dependencies
- Map out the new cloud-based architecture
- Make any needed app modifications to support the new infrastructure
- Optimize web app performance
- Automate deployments to the new AWS infrastructure
- Correct issues with the existing database servers
- Document the migration plan for each app
- Perform several dry runs of the migration plan
- Migrate and validate each app
Map the existing architecture
We began by investigating the existing infrastructure for each web app. Thankfully, most applications were simple and had few dependencies.
A few applications, however, had more dependencies.
Generally these dependencies did not significantly alter our new architecture, but did require additional testing prior to the production migration.
Planning the cloud-based architecture
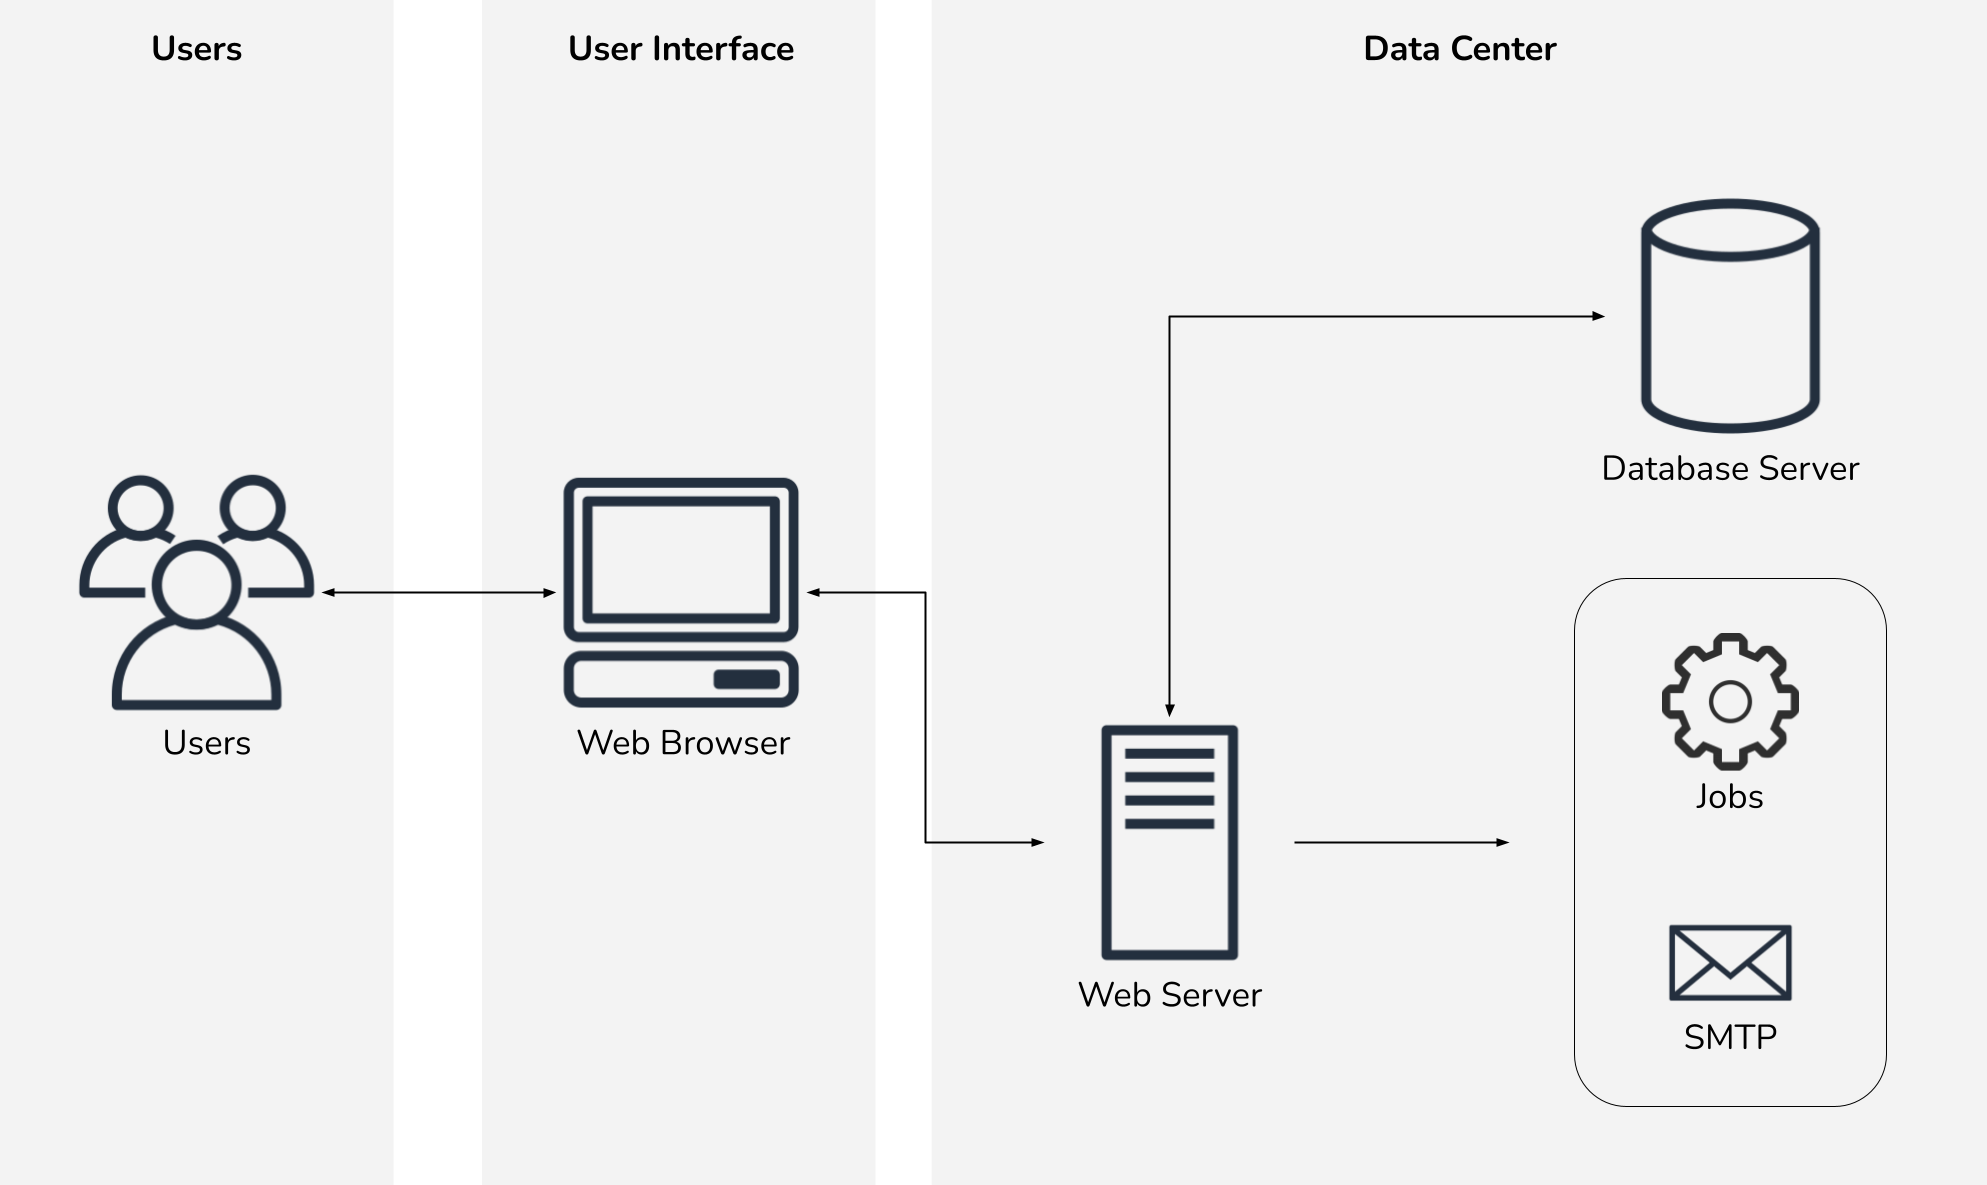
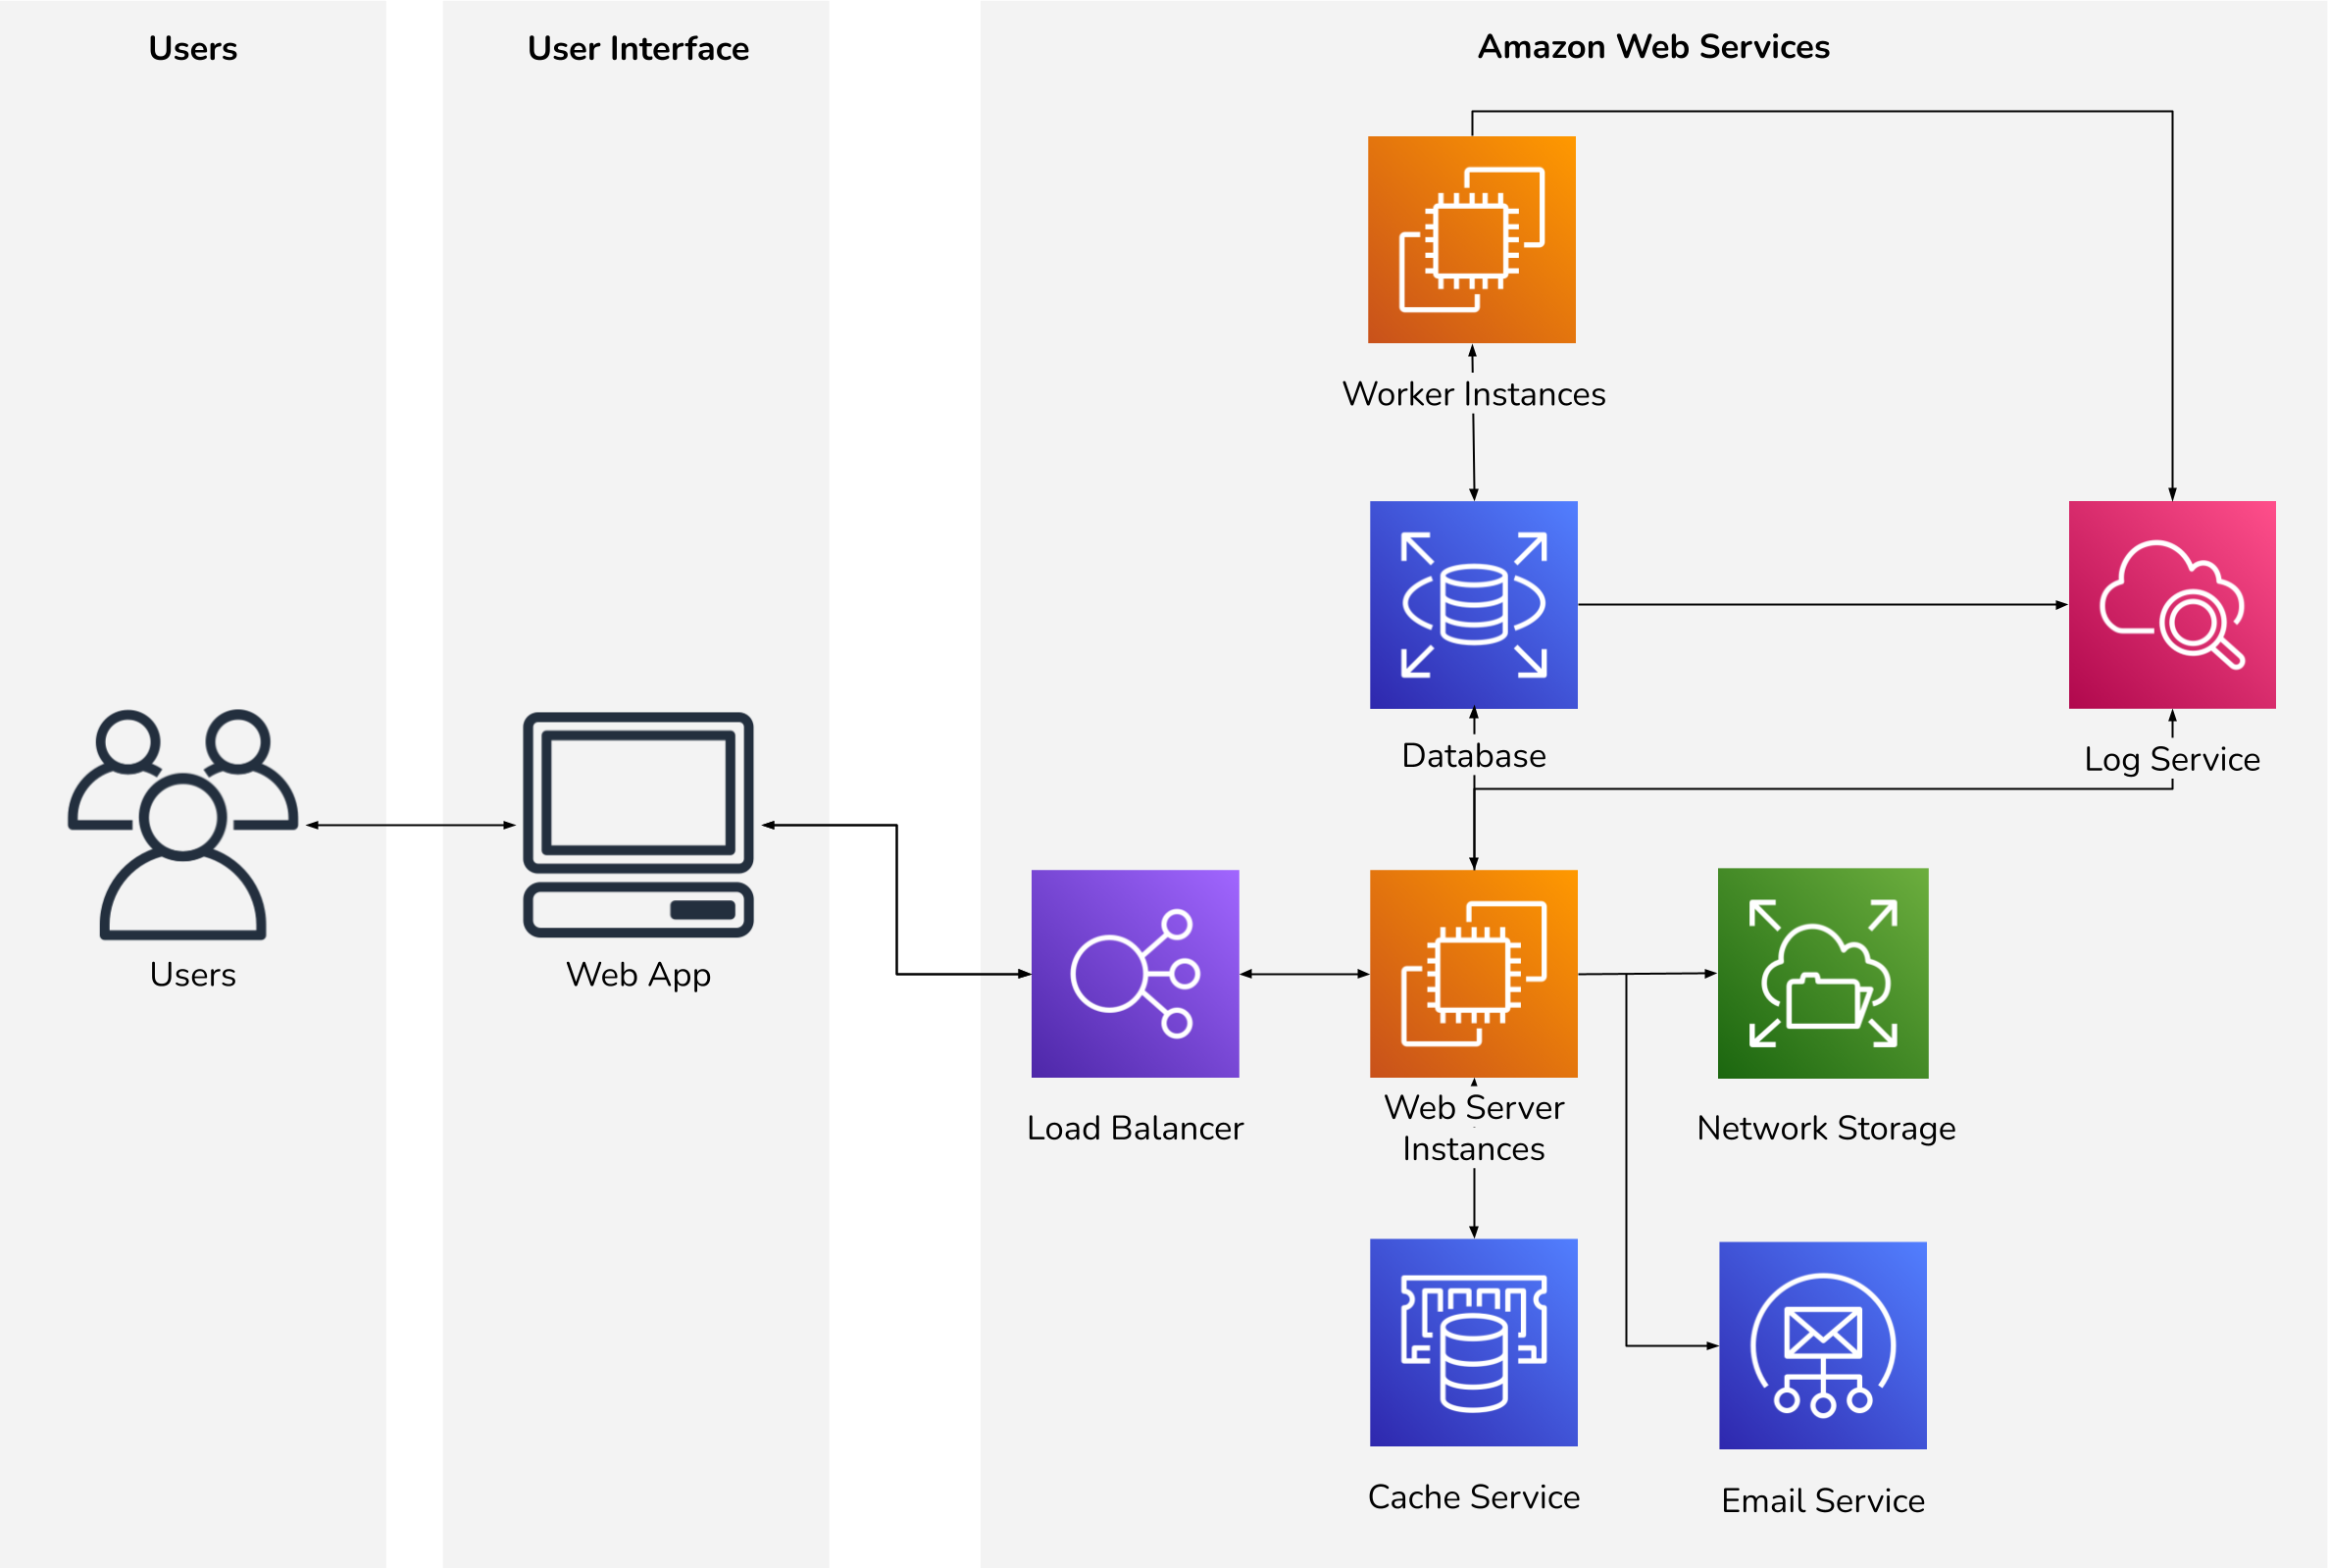
As our team planned to take over day-to-day management of the new AWS infrastructure, we focused on designing a resilient, scalable, and manageable architecture. We also wanted to ensure that our client wasn’t locked in to using a particular cloud provider. Therefore, we decide to Dockerize each web app and utilize Elastic Beanstalk’s Elastic Container Service (ECS) platform.
Elastic Beanstalk simplifies deployments, environment configuration, and horizontal scaling. Combined with ECS’s containerization support, we could keep all server configuration encapsulated within Docker containers. Since Docker is so widely supported across cloud providers, we could reasonably move to another provider at our client’s discretion with minimal adjustments.
This automated and repeatable configuration approach was in stark contrast to the existing production environments. The existing infrastructure was manually configured, with many service dependencies residing on the snowflake servers. Running all services from a single server would not be feasible on Amazon Web Services, requiring us to devise a new architecture.
For example, the existing web app servers sent their own email via sendmail. This is not permissible in AWS due to their anti-spam policies, so we needed to utilize AWS Simple Email Service (SES). Since the web apps only sent transactional emails, we decided to keep email services in AWS. However, other third-party email service providers such as SendGrid or Mailgun would have met our needs just as well.
This architecture looks very different from the existing setup. Our approach to cloud-based hosting is completely different from the snowflake servers we were replacing. Leveraging everything that cloud-based infrastructure offers requires a change in how you model systems.
Instead of treating each server as special or necessary, our new servers would be treated as cattle, not pets. That is, we expect we will have hardware failures. To combat this inevitability, we designed an architecture to treat all resources as replaceable.
Instead of setting up a single server to host each web app, we created repeatable configurations that can be applied to new servers as needed. For example, if a web server is determined to be “unhealthy” or unresponsive, we can have the load balancer provision a new web server, apply our configuration, and replace the unhealthy one. Similarly, if a single server is not enough to handle a traffic surge, the load balancer can provision as many servers as needed to handle the load. That is, we expect the needs of the system to grow as our client’s business continues to grow.
That dynamic and responsive approach to infrastructure is a key benefit of cloud-based hosting. You would have to over-provision hardware in your own data center to reap the same benefits.
Performance analysis
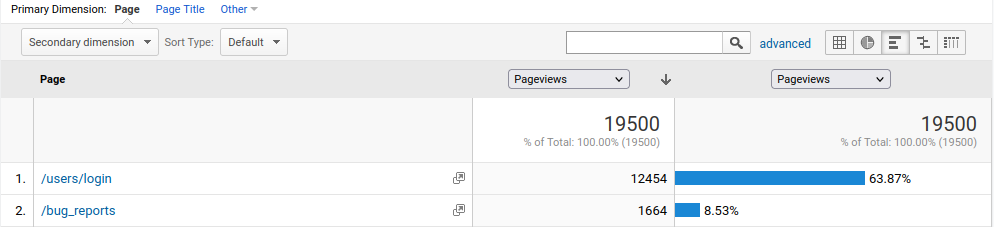
To ensure that we right-sized our new infrastructure, we evaluated resource utilization on the existing infrastructure. We identified the ten most active endpoints on each web app and focused our performance analysis on those endpoints. Several of the web apps used Google Analytics, which we used to reveal a list of the most visited pages over the past 12 months.
Some web apps did not have any sort of analytics or application performance monitoring in place, so we analyzed traffic patterns using Apache server logs. This involved a bit of shell scripting to count the number of visits for each endpoint:
# count the number of visits to each path, sorted by descending visit count
for file in /var/log/apache2/access.log*; do
    cat $file | grep -E "GET /[^ ]+" | cut -d ' ' -f 6 | sort | uniq -c | sort -nr | head -10
done
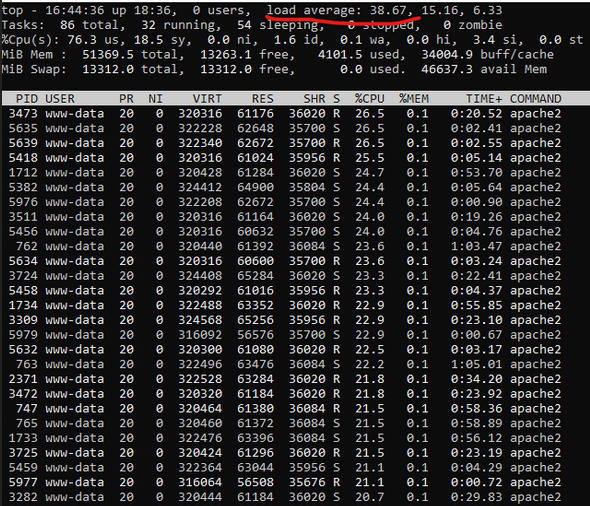
We then used platform-specific performance analysis tools to determine which of these endpoints needed the most attention. The highest-traffic sites we needed to optimize used Laravel, a popular PHP framework. We used Laravel Debugbar to analyze those web apps.
You can see that we had some work to do:

This was the most extreme example, with over 1,500 database calls to load a rather simple page. However, several popular pages on each site would make hundreds of database calls:

There were enough of these unoptimized pages that we decided a caching layer would be more cost-effective than individually optimizing each page.
Refactoring to support the new architecture
Naturally, some of these architectural changes would require changing how the web apps interact with other services. Since we moved supporting services off of the web app servers themselves, we needed to make integrations with those services more configurable.
Most of our refactoring was simple: making hard-coded values configurable, or turning certain features on or off depending on environment. Sending email through SES meant specifying an SMTP hostname and credentials, and in some cases upgrading email delivery to use TLS for improved security. We introduced Memcached to cache database query results and server-side rendered views.
Caching rendered views did require adjusting how some components were rendered. The web apps did not have a built-in mechanism for view caching, so we had to implement our own. We had a generic caching solution ready for the highest-traffic sites with a few hours of work.
Performance optimization
Our caching solution helped us take pages with hundreds of database calls down to 10-15 database calls for most pages:

We analyzed app performance by using the web app as a single user. This certainly led to needed improvements in the user experience, but the question still remained: how do we ensure that we plan the right capacity for each web app on AWS?
Load testing
We set up staging environments in AWS to test our new infrastructure. Starting with some relatively modest capacity choices (1-2 t3.small instances per web app), we performed load tests on the most popular pages on each site. We built some simple load testing scripts that wrapped Apache JMeter commands:
require 'ruby-jmeter'

name = 'example'
environments = {
    aws: {
        base_url: 'https://staging.example.com'
    },
    datacenter: {
        base_url: 'https://production.example.com'
    }
}

thread_counts = [1, 5, 10, 20, 50, 100]
environments.keys.each do |key|
    base_url = environments[key][:base_url]
    thread_counts.each do |thread_count|
        test do
            threads count: thread_count, loops: 100 do
                visit name: 'Home Page', url: "#{base_url}/" do
                    assert contains: '<title>Website Name Goes Here</title>', scope: 'main'
                    assert contains: 'Text rendered from database query results goes here.', scope: 'body'
                end
                # additional pages and actions were performed here.
            end
        end.run(log: "#{name}-#{key}-#{thread_count}-threads.jtl")
    end
end
The above produced several logs, one for each thread count and environment. We reviewed these logs to compare the performance of our new infrastructure against the existing infrastructure.
Even though we configured Autoscaling in Elastic Beanstalk, we performed load testing in our AWS environments against a single t3.small instance for each web app to make a reasonable comparison to the existing data center’s performance.
Average Response Time (milliseconds)
| Environment | 1 Thread | 5 Threads | 10 Threads | 20 Threads | 50 Threads | 100 Threads |
|---|---|---|---|---|---|---|
| AWS | 216 | 265 | 439 | 883 | 1939 | 1973 |
| Data Center | 1950 | 1435 | 1173 | N/A* | N/A* | N/A* |
* We discontinued load testing on the Data Center environment, as it began to significantly increase
load average and could have had an adverse impact on production sites hosted on the server.
The AWS environment benefited from our caching solution and other architectural changes, so these improved performance metrics were expected. With our performance optimizations in place, we found that a single t3.small instance was sufficient for each web app. In fact, several web apps were able to run on a t3.micro based on their lower memory profiles.
Database improvements
As described earlier, we had several database issues that needed to be cleaned up before we could complete our migrations. This was relatively straightforward. We addressed missing foreign key constraints, testing against a local copy of the production database to ensure our new reference checks did not conflict with any existing data.
There were also a few tables that had become corrupted due to disk space issues on the production database servers. The servers would routinely run out of disk space, requiring someone to manually clean up old files. Unfortunately, sometimes disk space would run out during a write to a table. This would cause the table to become corrupted. MySQL thankfully has built-in tools to fix corrupted database tables, so fixing these tables was as simple as running a command on the affected databases:
REPAIR TABLE example_table_name;
We made our corrections to the existing production environments to minimize downtime during the AWS migration. Fixing the database issues prior to migration helped us perform several migration dry runs to ensure the final move would go as smoothly as possible.
Writing migration checklists
Once we were confident that our new infrastructure would serve our client’s needs, we prepared for the production migrations. We planned to migrate one site at a time and ensure each one performed well before migrating the next one. This approach reduced complexity and increased our confidence with each migration.
Since we had 16 web apps to migrate and many of them had very different migration steps, we knew there could be ample opportunity for human error during each migration. Dockerizing the web apps eliminated concerns about misconfiguring a server. Though, there were still several manual steps for each migration. We needed to turn on maintenance pages, sync data to the new database servers, sync storage directories, update DNS, and proxy traffic from the old server to the new environment (to catch any straggling DNS clients).
There were dozens of small steps to take during each migration. We wrote a checklist to capture each step. Additionally, we documented all of our validation steps. These validation tests would give us a clear indication that our migrations were successful.
Further, we planned for contingencies in case something unexpected occurred. We outlined steps to roll back to the data center environment if needed. We fully expected our migrations to succeed, given our thorough testing and planning, but wanted to minimize the risk of surprises. A plan to revert to the data center environment would allow us to quickly restore service to our clients if something unexpected occurred. While we never needed to execute the rollback plan, it did give us peace of mind during each migration.
Automating migration steps
Our migration checklists were rather long and could contribute to manual errors during each migration. With so many migrations to perform, we wanted to minimize the opportunities for error as much as possible. Any one failure could push back our overall schedule and shake our client’s confidence. We decided to automate several manual steps to mitigate potential problems.
While we knew not every step could be reasonably automated, several could. Loading data from the existing environment and into the new environment required several manual steps. A combination of mysql, rsync, and scp commands were needed to copy databases and storage directories for each site. We authored shell scripts to automate these steps.
These scripts were simple. Most replaced just a few commands. However, each script reduced opportunities for error and helped speed up the slowest steps (copying data).
#!/usr/bin/env bash

##
# Copy the storage directory for a site environment from the legacy production server for client-hosted sites.
# Usage: client-copystorage [site hostname] [path to the desired storage directory]
##

if [ $# -lt 2 ]
  then
    echo "Must supply an environment name and a path to a storage directory. Example usage:"
    echo "  client-copystorage SITE_HOSTNAME PATH_TO_STORAGE_DIRECTORY"
    exit 1
fi

USERNAME=`whoami`
SERVER_IP="172.10.100.42"
rsync -vaz "$USERNAME@$SERVER_IP:/var/www/html/$1/shared/storage/*" "$2"
By the time we migrated the first site, we had scripts for syncing storage directories, copying databases, loading environment variables, and connecting to AWS RDS databases by their associated Elastic Beanstalk environment name. As we wrote these scripts for the very first site migration, we realized we could also automate preparation tasks such as Dockerizing each web app. We automated copying existing server configurations, dependencies, and application configuration files to speed up each site’s prep work.
The first few web apps would take us up to a week to prepare for migration. By the end of it, we were migrating a new web app every 2 days, primarily thanks to our scripts and checklists.
Dry runs and final checks
We established a rule early on for each migration: we must have three consecutive dry runs through the migration checklist before scheduling the production migration. Repeatedly running through our checklists drastically reduced the chances of something going wrong during the production move. By the time we scheduled a migration, we knew we had worked out all the kinks and could follow our documented steps.
A friend of mine once told me that checklists allow you to think when you aren’t stressed so you don’t have to think when you are stressed. Giving ourselves time to plan for problem scenarios made every production migration feel very predictable. Rehearsing our steps beforehand gave us a calm confidence during each migration.
Successfully migrating the production web apps
Once we completed dry runs, we’d move the production site. Our step-by-step migration procedure, automated scripts, and validation checklists made each migration a success.
The benefits were nearly immediate for the client’s IT department. They no longer had to manually reconfigure or troubleshoot servers. The old servers could be shut down and removed from the colocation data center to reduce costs, decreasing overall monthly spend on infrastructure.
A combination of performance optimizations, more resilient architecture, and AWS CloudWatch alarms has significantly reduced the time investment for managing these web applications. Health checks ensure that each new deployment is in a healthy state before serving end user traffic. Autoscaling ensures each web app has the resources allocated to economically handle its current level of traffic.
On the old infrastructure, downtime and service degradation were common. Months after moving to the new infrastructure, we have maintained a spotless uptime record with virtually no manual intervention.